

This guide will show you how to connect and activate Customer Match lists using the Google Tentacles and Google Ads framework. The framework can be used to activate your (FPID) data in the marketing and advertising platforms. Consider building a headless Customer Data Platform (CDP) within an (existing) cloud/data environment without an expensive CDP tool or suite What are Tentacles? Tentacles is an (unofficial) Google framework, operating serverless using different services within the Google Cloud Platform, like Cloud Functions & PubSub. The integration framework is able to handle large amounts of data to be sent to other, mostly marketing-related Google products (like Google Analytics data upload, Google Campaign conversions, or Google Ads Custom Audiences). Next to all the Google-related connectors, the framework handles tasks like queueing, batching, rate-limits, and (error) logging and therefore can be used perfectly for building custom connectors, like a Facebook Custom Audience connector we’ve to build. More background information on the framework is in this article. 1. Preparation If not present already, create a Google Cloud project (instructions) where you can run Tentacles. Tentacles provide you with a bash install script, that will check and activate all services / APIs needed. It assumes you’re a project administrator, so if it’s not possible to grant administrator rights, at least you need the following permissions/roles; The following services / APIs are used by Tentacles, if not activated already, the install script will enable it for you; In new GCP projects, you have to select a Datastore / Firestore operation mode. For Tentacles, choose the Firestore Native mode. You can’t change this setting later on, so make sure you set it to Firestore Native mode. Create an OAuth Client Google Ads API basic access In Google Ads, create an API developer token and apply for API basic access. This will take some days. See documentation 2. Installation/deployment Let’s move on to the deployment of Tentacles. The install script will enable all the services if not already, creating the Pub/Sub topics, Cloud Functions, Cloud bucket, and triggers. The next step is to configure the Google Ads Customer Match connector. 3. Configure the Google Ads connector The Google Ads connector uses the Google Ads API (not the old Google Adwords API). It expects; Be aware that you’re uploading customer data to Google, so make sure you have the correct consent / permissions from those users. Connector configuration Every Google Ads audience needs to be defined in the config_api.json file. For the same audience, you have to create 2 configurations, one for create operators and one for remove operators. As I’m told, this is because Tentacles mimics the behavior of the Google Ads API. The Google Ads API separates create and delete operations. Next to that, using multiple identifiers (like hashed email and phone) also results in additional configurations, because the Google Ads API also separates these operations. Setting Description developer token Google Ads developer token. Make sure you have Basic Access to the Google Ads API customer_id Google Ads account ID where you want the audiences to be created login_customer_id Google Ads MCC account-ID, when accessing the account through an MCC. list_id Google Ads Customer Match list ID > You will have to create the audience first in the interface and fetch the ID. Hopefully, automatic audience creation will be added in the future list_type Type of identifiers you wish to upload to this audience, for example hashed_email or hashed_phone_number. See this page. operation create or remove, so you have to create two separate configurations for the same audience Example config_api.json file. ACM: Ads Customer Match configurations (the config_api.json can also contain configurations for the other connectors Then, run the following command to upload or update the config into Tentacles (the bash script will load or update the configuration into the Firestore database). The install script doesn’t remove entries in the Firestore database, only adds or updates. Now, Tentacles is all set to receive the JSON files containing the create and remove operations for Google Ads audiences. 4. Automate the Google Ads import files The last step is to automate the generation of the newline delimited JSON files. The naming of these files should like like API[ACM]_config[audience_1_add]_<YYYYMMDD>.json, where the connector key (ACM) and config key (audience_1_add) should match the entries in config_api.json The content of the newline delimited JSON files should look like; Most likely, you will have to execute the following tasks; You could use the following SQL to calculate differences based on two date-sharded tables (current date vs. previous date): There are a lot of solutions possible automating these tasks, but you could use one of the following setups; Apache Airflow has all the connectors available to automate these tasks (create audience tables, create intermediate / delta tables) and export them in JSON format to the Tentacles Cloud bucket. Using Apache Airflow, you can create a scalable solution that can handle a lot of audiences. Summary Tentacles will enable you to activate your data directly out of your cloud environment pretty easily. It could save some money compared to expensive CDP tools/suites, but keep in mind Some last tips; Useful links & documentation
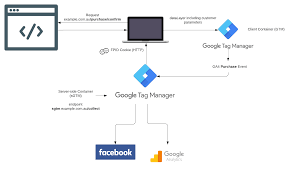
FPID for Google Analytics Within Server side tracking
When server-side tagging is available, the developers can vastly improve the data collection capabilities of Google Analytics platforms(Universal Analytics and App+Web). The ability to build our own templates is particularly potent with a Sever container. In the built-in Universal Analytics Client template in the Server container, there’s an option to migrate to a Sever Managed Client ID. When using this client for proxying Google Analytics requests, the Server container introduces a new cookie that is only accessible to the web server and not to browser JavaScript. This cookie is named FPID (First Party Identifier) by default. The value stored FPID will be used for setting the Client ID in the request to Google’s servers. How does It work? Google Analytics uses the &cid URL parameter in its data collection HTTP request to pass the Client ID from the browser (or device) to Google Analytics servers. This Client ID is persisted in a first-party cookie written (and read) with JavaScript. With FPID, Google is moving away from the JavaScript-accessible cookie to an HTTP-set one, which is further secured with the HttpOnly flag. The new setting in the Universal Analytics Client gives you a couple of approaches to migrating (or not). Javascript Managed- Business as Usual When you set the configuration in the Client to JavaScript Managed, the Client will read the incoming request as usual, use the &cid parameter from the request to set the Client ID in the outgoing request to Google Analytics, and then not really do anything else. So if you don’t want to use this new way of storing the client identifier, you need to set the option to JavaScript Managed. Server Managed- New HTTP Cookie However, when you set it to Server Managed, the Client will now parse the identifier from a new cookie and prefer that to what the browser (or device) sends as the value of the &cid parameter. The new cookie is written in the Set-Cookie HTTP header in the response back to the browser or other network source. In other words, without making adjustments (see below), the Server container will generate a new FPID cookie (if one doesn’t already exist) and use that to populate the Client ID of the outgoing request to Google Analytics servers. The cookie is set with the HttpOnly flag, which means it is not accessible to the browser JavaScript. Only the webserver can read the value of the cookie. This mitigates against cross-site tracking, as first-party JavaScript-readable cookies are often repurposed for building cross-site profiles. Setting the cookie in the HTTP response also makes it a bit more resilient against browsers with measures in place to reduce the utility of JavaScript cookies (see e.g. Apple’s Intelligent Tracking Prevention). Migrating From JavaScript Managed To Server Managed To ensure that the Server container doesn’t just start creating new Google Analytics users en masse, you can select the Migrate from JavaScript Managed Client ID option. With this option, the Universal Analytics Client will continue using the original JavaScript Managed Client ID value until such a time that the _ga cookie is deleted or the Client ID is reset. At that point, the system will migrate to the new Server Managed option stored in the FPID cookie. Here’s what it does in detail: Note that the FPID hash generated from the &cid value also includes a server-side seed, making it impossible to deduce the FPID value from that stored in the _ga cookie using client-side code. If these hits sent by the Server container are collected in a new Google Analytics property, it makes no sense to enable the migration option, as there would be no pre-existing users. Just use the Server Managed option without the migration selection checked. On the other hand, if you start with a Server Managed setup but then want to switch to the migration flow, perhaps because you decide to start collecting to your main Google Analytics property instead of a test property, you can enable the migration option. However, you’ll first want to rename the FPID cookie, or else the value stored in FPID from the original setup will be used instead of the Client ID of the incoming request. Renaming the FPID cookie essentially resets it. Multiple Google Analytics Cookies One problem that arises with the Server Managed FPID a cookie is when your site’s trackers use different Client IDs. This is quite common, especially with cross-domain tracking, where the roll-up cookie is kept separate from the regular Google Analytics cookie to avoid cross-domain tracking from overwriting the Client ID for trackers that don’t want to use cross-domain tracking. There is no support for multiple Client IDs in the Server Managed FPID option, so if you don’t want the Server Managed option to break your multi-cookie setup, you need to hold off until a solution is released. No Cookieless Option Client-side Google Analytics can be used without cookies. This is a viable option in the EU if the user hasn’t given consent for storing or persisting any data in the browser or device. Unfortunately, the Server Managed FPID cookie doesn’t currently have a way to comply with this wish. Incoming HTTP requests claimed by the Client with the Server Managed option activated generate the FPID cookie in all cases. Summary If Google Analytics engineers were given a chance to redesign how GA persists in the client identifier, they would build GA with the FPID (or something similar) and steer far away from JavaScript cookies. Cookies are notoriously tricky to get right, but the fact is that the closer they are to client-side access, the less secure they are. Even though the Google Analytics identifier doesn’t have any personal data encoded within, nor can it be used as an access key for any authentication systems, it’s still a vector for cross-site tracking. The Google Analytics cookie is a persistent first-party identifier that can be repurposed for cross-site tracking in cookie syncing setups, for example. By moving the identifier to a HttpOnly cookie, the identifier is protected from misuse. Give FPID a spin – you can use the JavaScript Managed option for best compatibility. Just be mind
Cross Domain Tracking with GTM-Sever-Side FPID Cookie
Cross Domain Tracking of the FPID cookie in server-side tagging for Google Tag Manager is an HttpOnly, server-managed ID cookie that’s designed to replace the JavaScript-managed _ga cookie used by Google Analytics 4 and Universal Analytics. In that article, I mentioned one caveat for adopting FPID is the fact that cross-domain tracking will not work. I mean, how could it? FPID is an HttpOnly cookie, which means it’s not available to JavaScript in the browser. Cross-domain tracking, on the other hand, decorates links dynamically as users click them, which means it needs the cookie to be available via JavaScript so that it could be decorated into the target page URL. Well, Google has now released a solution for cross-domain tracking with FPID, and it’s probably something you already expected (if you know your way around cookies). Cross Domain Tracking with the FPID Cookie How to create HttpOnly cookie available to JavaScript? By creating a version of the cookie that isn’t HttpOnly If you have the Server Managed option selected in your GA4 or UA Client in the Server container, it means that the Client will write the FPID cookie and use it instead of the JavaScript-accessible _ga cookie. Now, you’ll be able to see how in addition to the FPID cookie, the HTTP response from the Client back to the browser also includes the FPLC cookie in some requests. This FPLC cookie is the cross-domain linker cookie hashed from the FPID cookie. It’s not HttpOnly, which means it can be read with JavaScript. It has a relatively short lifetime, just 20 hours. It means that if the page is loaded and use stays on the page for 20 hours and 1 minute, then cross-domain tracking will not work event if they click a link with flagged URL. They will need to reload the page to get FPLC cookie again. If you have configured cross-domain tracking in either Google Analytics 4 admin or in the Universal Analytics web tag, the corresponding JavaScript library is configured to read this new cookie. So, when the user then clicks a link that has been flagged for cross-domain tracking, the URL will include a hash of the FPLC cookie (which is, in turn, a hash of the FPID cookie) in addition to the regular Google Analytics linker parameters. For cross-domain linking to work in the target URL, the page must of course be running a Server container, as that’s the only place where FPID is relevant. The server container picks up the FPLC a cookie in the request headers checks that it’s valid, and then creates the FPID cookie with it, if all goes well. There’s an important catch here. The Server containers running on the source and target sites MUST belong to the same Google Tag Manager account! In other words, it’s OK to have different containers, but they must belong to the same GTM account. I’m guessing it has something to do with how the hash is calculated. And that’s how cross-domain tracking with the server-side FPID cookie works! It’s of course a bit disappointing that a new cookie is required when the whole point of FPID was to move the ID away from the client. Well, FPLC isn’t the ID itself – it’s a hash of the ID and will never be used as the identifier in the requests. Also, cross-domain tracking just happens to always require a client-side component! Due to how browsers work, the only alternative would be to add fingerprinting into the mix of ID resolution, and that’s a nasty can of worms I’m sure the Google Analytics team doesn’t want to touch with a long pole. Although, technically they already do some fingerprinting in the linker parameter (to make sure that the browser is the same between the source and target URLs). Anyway, this feature is certainly something that many have been waiting for since FPID was released, myself included.

GTM Server-Side Transformations
GTM Transformations is a new feature and resource type in server-side tagging, which you can access through the new entry in the container resource navigator. Transformation is middleware b/w the client and tags, allowing you to include and exclude parameters from the event data objects before tags can access it. You can also use it to augment existing parameters. This is useful if you want to enrich the event data object with an appropriate. Transformations In A Nutshell To understand transformations, you first need to understand how clients and tags interact in a server-side tagging container. A client is a server-side tagging resource that consumes incoming HTTP requests and turns them into an event data object. This event data object is then consumed by tags in order to perform their tasks, such as dispatching requests to third-party vendors. The event data object semantics are not standardized or enforced, but it is recommended that clients follow the schema outlined by Google. For example, a client could take a URL parameter &cid=99881.99881 and turn it into an event data object key named client_id with the value 99881.99881. Tags could then be coded or configured to take this client_id key from the event data object and populate their own outgoing requests with the value. The best way to check what type of event data objects are generated by clients is to use Preview mode. When you select an event in the left-hand navigation, the Event Data tab will show what the client produced. The main problem with event data is that the client’s operations are fixed. The event data object it produces is the same for all tags that are configured to make use of it. If you want a tag to ignore certain fields in the event data object, or if you want a set of tags to mutate some of the values into another format, the tag template itself needs to support this, and not all tag templates do. Furthermore, Google’s own clients, which the majority of users will default to as the main controllers of the incoming data streams, are black boxes and there’s not much you can do to control how they work. For a long, we’ve been waiting for a feature that would allow us to edit the event data object itself before tags get to consume it. This is where transformations enter the stage. With transformations, you can now create a rule that removes or modifies the values in the event data object before tags can access it. Instead of having to make tag-specific exceptions, you can now modify the event data object itself. After doing so, any tag that is set to consume this transformation will be privy only to the modified event data object rather than the original one. Importantly, transformations don’t permanently edit the event data object. They create a transformed clone of the object to be digested by whatever tags and whatever conditions you specify in the transformation (more about these below). Tags that are not affected by a transformation will have access to the original, unmodified event data object. Create a new Transformation To create a new transformation, click the Transformations entry in the left-hand navigation of your server-side tagging container. You’ll see a list of your existing transformations. If you click the button labeled NEW, you can create a new transformation. Tranformation Types Transformations come in three types: Allow Parameters When you choose Allow parameters as the transformation type, you’ll need to populate a table of rows, with each row corresponding to a parameter name in the event data object. When this transformation is evaluated, the keys in the event data object are compared against the parameters listed in this transformation. If there’s a match, that key is kept in the event data object. If there’s no match, then the key is dropped from the event data object for this transformation. In the example above, the only allowed parameters are client_id, event_name, ga_session_id, and custom_timestamp. Other parameters are not included in this transformation. This is a very powerful transformation type, as it lets you proactively exclude all parameters that you are not aware of or that you haven’t exclusively allowlisted for the tags that consume this transformation. It’s also a risky transformation type because of this. Especially when working with third-party vendors, you might not know exactly which parameters the vendor needs due to poor documentation or lazy template design. The Allow parameters transformation is most potent when you’re working with a service for which you know exactly which parameters are required and which are optional. EXCLUDE PARAMETERS Like Allow parameters above, parameter exclusion requires you to populate a table of rows, with each row corresponding to a parameter in the event data object. However, this time when comparing keys in the event data object against this list, any key that matches between the two is dropped from the event data object. Keys that are not matched are kept. In this case, client_hints and ip_override have been excluded from the final event data object in this transformation. That’s why they have empty values above whereas all the other parameter values are preserved. While the allowlist is more proactive and pre-emptive as a measure, the Exclude parameters transformation lets you remove parameters that you know to be problematic. AUGMENT EVENT Event augmentation is what you’d use for data enrichment and for cleaning up the contents of the event data object. Instead of removing or keeping parameters, the augment event transformation type lets you add new keys to the event data object and/or modify existing values. When you add parameter names and values into this transformation, any parameters that share the same name in the event data object get overwritten by the transformation’s value for the given parameter. If there is no pre-existing parameter with that name, a new one is added to the event data object. In the example above, with the exception of currency, all the ecommerce parameters are retrived from firestore The cool thing is that the values you set support the full range of server-side Google Tag Manager’s variable capabilities, including things like asynchronous API calls and Firestore lookups. While event augmentation is very useful for removing sensitive information from the page_location field, for example, its biggest potential lies in enriching the information in the event data object so that a multitude of tags can make use of the modification. TRANSFORMATION PRIORITY It’s possible

Identity Resolution and Privacy Compliance with an Identity Graph in a Customer Data Platform (CDP)
In today’s digital landscape, businesses are inundated with vast amounts of customer data from various sources. Customer Data Platforms (CDPs) have emerged as powerful tools to help organizations effectively manage and utilize this data to drive personalized marketing strategies and improve customer experiences. However, with the increasing focus on data privacy regulations and the need for accurate identity resolution, implementing robust identity resolution and privacy compliance mechanisms within a CDP has become crucial. One of the key components of achieving this goal is leveraging an identity graph—a powerful tool that connects disparate data points across different channels and touchpoints to create a unified view of the customer. In this blog post, we’ll explore how businesses can implement identity resolution and privacy compliance using an identity graph within a CDP. Understanding Identity Resolution Identity resolution or Identity Graph is the process of accurately linking various identifiers associated with a single individual across different data sources. These identifiers may include email addresses, phone numbers, social media handles, device IDs, and more. By resolving identities, businesses can gain a comprehensive understanding of their customers’ behavior and preferences, enabling them to deliver personalized experiences at scale. The Role of an Identity Graph An identity graph serves as the backbone of identity resolution within a CDP. It maps the relationships between different identifiers associated with individual customers, allowing businesses to create a unified customer profile. The identity graph aggregates and reconciles data from disparate sources, enabling businesses to identify and eliminate duplicate records while connecting related data points. An identity graph serves as a highly adaptable and efficient method for organizing and managing information. It enables storing consent alongside relevant identifiers, ensuring a clear understanding of the data and its authorized usage for activation purposes. By incorporating this data into the overall data structure, you can ensure that your automation processes and activities align with customer consent, thereby upholding privacy and compliance standards. Implementing Identity Resolution with an Identity Graph in a CDP Conclusion Implementing identity resolution and privacy compliance within a CDP is essential for businesses looking to leverage customer data effectively while maintaining trust and compliance with regulations. By leveraging an identity graph and following best practices for data management and privacy, organizations can unlock the full potential of their customer data while respecting individual privacy rights. With a unified view of the customer enabled by identity resolution, businesses can deliver personalized experiences that drive customer engagement and loyalty in today’s data-driven world.

Democratize AI Across the Enterprise with Customer Data Platform(CDP)
In today’s fast-paced business environment, harnessing the power of artificial intelligence (AI) is no longer just an option—it’s a necessity for staying competitive. However, AI adoption has traditionally been hindered by barriers such as siloed data, lack of expertise, and limited access to resources. Fortunately, advancements in technology, particularly the emergence of Customer Data Platforms (CDPs), are democratizing AI across the enterprise, making it accessible to all teams regardless of technical expertise. In this blog post, we’ll explore how businesses can leverage a CDP to democratize AI and unlock its transformative potential. The Challenge of AI Adoption Implementing AI initiatives within an organization can be daunting. It often requires specialized skills, extensive data infrastructure, and significant financial investment. As a result, many businesses struggle to leverage AI effectively, limiting their ability to extract actionable insights from their data and deliver personalized experiences to customers. Democratizing AI with a CDP A Customer Data Platform (CDP) serves as a centralized hub for collecting, organizing, and analyzing customer data from various sources, such as CRM systems, marketing platforms, and e-commerce channels. By consolidating data into a unified platform, a CDP breaks down data silos and provides teams across the organization with access to a comprehensive dataset for AI-driven analysis and decision-making. Here’s how businesses can democratize AI across the enterprise with a CDP: 1. Centralized Data Management A CDP aggregates customer data from disparate sources and cleanses, deduplicates, and standardizes it to ensure accuracy and consistency. This centralized approach to data management enables teams to access a single source of truth for all customer-related information, eliminating the need to navigate through multiple systems or departments to obtain the data they need. 2. Advanced Analytics Capabilities Many CDPs offer built-in analytics tools and integrations with third-party AI and machine learning platforms, allowing teams to perform sophisticated analyses and derive actionable insights from their data. Whether it’s segmenting customers based on behavior, predicting future trends, or optimizing marketing campaigns, the advanced analytics capabilities of a CDP empower teams to make data-driven decisions with confidence. 3. Self-Service AI Tools One of the key features of a CDP is its self-service capabilities, which enable business users to access and analyze data without requiring assistance from data scientists or IT professionals. With intuitive dashboards, drag-and-drop interfaces, and pre-built templates, teams can explore data, create custom reports, and generate insights on their own, accelerating the pace of innovation and driving business outcomes. 4. Real-time Personalization By integrating AI models with real-time data streams within the CDP, businesses can deliver hyper-personalized experiences to customers across all touchpoints. Whether it’s recommending products based on past purchases, tailoring content to individual preferences, or predicting customer intent in real-time, AI-powered personalization drives engagement, loyalty, and revenue growth. 5. Ensuring Data Privacy and Compliance As organizations leverage AI to analyze and utilize customer data, it’s imperative to prioritize data privacy and compliance with regulations such as GDPR and CCPA. A CDP provides built-in capabilities for data anonymization, consent management, and access controls, ensuring that sensitive customer information is handled securely and ethically throughout the AI development and deployment process. Conclusion Democratizing AI across the enterprise with a Customer Data Platform (CDP) empowers teams to leverage the full potential of their data and drive innovation, improve operational efficiency, and enhance customer experiences. By centralizing data management, providing advanced analytics capabilities, offering self-service AI tools, enabling real-time personalization, an
Cookies- Age of Extinction
The Cookie Full Context In the rapidly evolving landscape of digital marketing, businesses are facing a transformative shift towards cookies-less technologies. The imminent demise of third-party cookies has ushered in a new era of privacy-centric practices, challenging organizations to reevaluate their digital strategies. This paradigm shift towards a cookies-less future demands innovative approaches and a comprehensive digital transformation strategy. Understanding the Cookie-less Landscape: Cookies have long been the backbone of online advertising, enabling targeted marketing and personalized user experiences. However, concerns about user privacy and increasing regulations, such as GDPR and CCPA, have accelerated the shift towards a cookie-less ecosystem. The rise of privacy-focused browsers and changes in major platforms’ policies underline the urgency for businesses to adapt. Major Players already phased out or in that direction over the period. As from January 4, 2024, Google has also mentioned that third-party cookies will be removed and provide new feature called Tracking Protection. Google originally announced a two-year delay for the phase out in 2021, but the delay was primarily to give marketers more time to adjust their advertising approach. Challenges in Cookies-less landscape: Customer Data Platform is to Rescue Customer Data Platforms (CDPs) emerge as a robust solution in the cookieless world, addressing many of the challenges advertisers face while capitalizing on the opportunities. By amalgamating data from zero, first, second, and permissible third-party origins, CDPs enable marketers to construct comprehensive user profiles. These profiles go beyond basic demographics to include detailed information about preferences, behaviors, purchase history, engagement patterns, and more. Armed with this intricate understanding of customers, marketers can: Nagarro addressing challenges in this Digital landscape: CDPs provide a centralized hub for collecting, organizing, and activating customer data from various sources. In the absence of third-party cookies, having a unified repository of first-party data becomes even more critical for effective targeting and personalization. With a focus on first-party data, CDPs empower advertisers to leverage customer insights obtained directly from interactions with the brand. This reduces reliance on third-party data and enhances the quality and relevance of targeting efforts. By consolidating customer data into comprehensive profiles, CDPs enable advertisers to deliver highly personalized experiences across channels. Advanced segmentation and audience analysis capabilities help tailor messaging and offers to individual preferences and behaviors. CDPs facilitate cross-channel attribution and analytics, allowing advertisers to measure the impact of their campaigns and optimize marketing strategies. Despite the absence of third-party cookies, CDPs enable granular tracking and analysis of user interactions within the brand ecosystem. How Nagarro is helping Leveraging Opportunities using CDP: Our strong tech knowhow allows us to take the CDP game to industry specific consultancy, advance analytics and AI driven use case implementations. Our team continues to build reusable AI models which can be easily integrated to any CDP and produce astonishing results for marketeers. We are helping customer to maximize value out from customer data platform to provide highly personalized user experience and employ targeted advertising strategies. CDPs often include consent management features, allowing advertisers to obtain and manage user consent transparently. Adherence to privacy regulations and user preferences is streamlined, fostering trust and compliance in a cookieless environment. In the absence of individual tracking, contextual targeting gains prominence. CDPs enable advertisers to leverage contextual and intent-based data to place relevant ads in the right content environments, maximizing engagement without relying on cookies. With real-time data processing capabilities, CDPs enable dynamic personalization of content and offers based on user interactions. Advertisers can respond to user behavior promptly, delivering timely and relevant messages across touchpoints. CDP is designed to be agile and adaptable, allowing advertisers to integrate new data sources, technologies, and compliance requirements seamlessly. This flexibility enables marketers to navigate evolving privacy landscapes and emerging advertising trends effectively. By harnessing insights from CDPs, advertisers can strengthen customer retention and loyalty initiatives. Personalized communication and tailored experiences based on comprehensive customer profiles foster long-term relationships and advocacy. Conclusion: In the cookie-less world, Customer Data Platforms emerge as a strategic solution for advertisers seeking to navigate challenges and capitalize on opportunities. By leveraging first-party data, enabling personalized targeting, ensuring compliance with privacy regulations, and fostering agility and adaptability, CDPs empower advertisers to thrive in an evolving digital advertising landscape. As the importance of privacy and data transparency grows, CDPs serve as a cornerstone for ethical and effective marketing practices.

CDP is Shifting Technology driven experience to Customer driven experience.
Customer Data Platforms (CDPs) are indeed playing a pivotal role in shifting the paradigm from technology-driven experiences to customer-driven experiences. Here’s how CDPs are facilitating this transformation: CDP Holistic Customer View: CDPs consolidate data from various touchpoints and channels to create a unified view of each customer. This comprehensive understanding allows businesses to shift their focus from merely leveraging technology for data collection to using insights gleaned from this data to understand and anticipate customer needs and preferences. CDP Personalization at Scale: By harnessing the power of CDPs, businesses can deliver personalized experiences tailored to each individual customer’s preferences, behaviors, and interactions. Instead of relying solely on technology to automate processes, businesses can use customer insights to inform personalized recommendations, content, and offers, thereby creating more meaningful interactions. CDP Real-Time Responsiveness: CDPs enable businesses to respond to customer interactions in real-time based on the latest data available. This allows businesses to shift from a reactive approach, where responses are based solely on predefined rules or algorithms, to a proactive approach that leverages real-time customer insights to anticipate needs and provide timely, relevant assistance. CDP Omni-Channel Consistency: CDPs facilitate omni-channel consistency by synchronizing customer data and experiences across all touchpoints, whether online, offline, or in-person. This ensures that customers receive a seamless and cohesive experience regardless of how they choose to interact with the business, fostering greater satisfaction and loyalty. Empowering Customer-Centricity: CDPs empower businesses to adopt a customer-centric mindset by providing actionable insights into customer behaviors, preferences, and sentiment. Instead of being driven solely by technological capabilities or internal processes, businesses can prioritize initiatives that align with customer needs and deliver tangible value to their customers. Continuous Improvement: CDPs support continuous improvement by enabling businesses to iterate on their customer experiences based on ongoing feedback and data-driven insights. Instead of viewing technology as a static solution, businesses can leverage CDPs to continuously optimize and refine their strategies to better meet evolving customer expectations and preferences. Building Trust and Loyalty: By delivering personalized, relevant, and timely experiences, businesses can build trust and foster loyalty with their customers. Rather than relying solely on technology to drive engagement, businesses can leverage CDPs to deepen relationships with customers by demonstrating an understanding of their unique needs and preferences. Conclusion In summary, CDPs are empowering businesses to shift from technology-driven experiences to customer-driven experiences by providing a holistic view of customers, enabling personalized interactions, facilitating real-time responsiveness, ensuring omni-channel consistency, fostering customer-centricity, supporting continuous improvement, and ultimately, building trust and loyalty. As businesses continue to prioritize customer needs and preferences, CDPs will play an increasingly critical role in driving customer-centric innovation and differentiation in the marketplace.
